Whether you want to add privacy, mark property lines or keep livestock in or out, fence installation can help you accomplish your goals. However, you must consider your needs, the cost, and local laws before beginning work.
Before digging for posts, contact the utility companies to find out where underground gas or water pipes are located. Depending on your locale, you may need to get a permit before beginning construction. Contact Fencing Charlotte NC now!
Before starting the fence installation process, it is important to prepare your yard for the construction. Whether you’re building your fence yourself or hiring a professional, a messy yard will make the work much more difficult and prolong the project. First, clear out any trash that may be lying around the yard and dispose of it. This includes things like old tires, broken toys, tarps, and so on. It’s also a good idea to get rid of any plants or shrubbery that might be in the way of your future fence. Finally, you should determine if there are any utility lines that should be avoided during the construction of your fence. If there are, you will need to contact the utility company and have them mark the locations so that you can avoid hitting them with your fence.
It is a good idea to walk the area where your fence will be installed and look for any large rocks, tree stumps, or other obstructions that could interfere with your building plans. In addition, it is a good idea to note any areas where the ground slopes significantly. This information will be necessary for determining where to place the posts and will help ensure that your fence is strong and stable.
If you’re planning to paint or stain your fence, it’s best to do this before beginning the construction process. This will give the wood a chance to dry and will prevent any problems with the finished product. Staining is typically done with a brush or roller and should be done with an oil-based stain. Depending on the size of your fence, you will likely need to apply more than one coat.
Posts
The posts provide the foundation for your fence. They can be made from wood, concrete, metal or other materials. Most fence posts are set in concrete for added strength and stability. The first step is to dig the post holes. Use a shovel or manual or powered post-hole digger to dig holes at the proper distance apart. A general rule is to bury the posts about 1/3 of their total length, but local building codes may require a specific depth.
While digging, add some gravel to the bottom of each hole for drainage. This will help keep excessive moisture away from the base of each post. Work quickly to ensure that you don’t run out of time. Once the post is positioned, use scrap two-by-fours to brace it if needed. Plumb the post with a bubble level or laser level. A hammer can also be used to drive the post into the ground, but be careful not to raise it too high or you could strike yourself in the head.
If you choose to set your fence posts in concrete, follow the manufacturer’s directions for mixing and pouring. After the concrete sets, slope it slightly away from the post. This will prevent standing water and prolong the life of your fence. Then, trowel the top of the concrete smooth and tamp it to eliminate air pockets that might cause water pockets to form. Add extra bracing to corner posts, as they must support the weight of a fence stretched in two directions. Let the concrete stand several days to acclimate to the temperature and humidity of your location before continuing with the construction process.
Rails
When the posts have been properly installed, it is time to start putting up the rails. This step is where the fence starts to take shape and develop its defining character. Depending on the type of fence you want, you will either install panels or pickets to the rails. Panels are large pre-fabricated pieces that can come in a wide variety of colors and designs. They are easy to install and provide a uniform look. On the other hand, pickets are individual boards that create spaces between them – perfect for that traditional white picket fence look.
When installing a fence, it is important to be accurate with your measurements. A little error can cost you a lot of time and money. If possible, have a friend check your measurements to ensure that they are correct. You also want to make sure that the post holes are deep enough. Ideally, they should be dug between 1/3 and 1/2 of the post’s length in the ground.
It is also important to consider the weather when installing a fence. If you live in a region that has a lot of rain, wood fences may not be the best choice because they will rot more quickly than other types of fencing materials. In contrast, vinyl and composite fences are relatively easy to install and require very little maintenance.
Before starting to build your fence, you should find out if your community has any restrictions on fence heights. If they do, you will need to follow them closely to avoid fines. You should also find out if you need to pay for a permit or if there are any set-backs from the property lines.
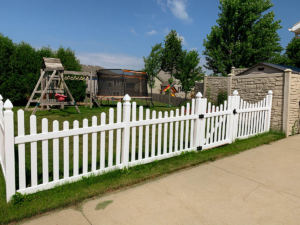
Pickets
Fencing pickets are the vertical slats that make up a fence wall. They come in a variety of styles including dog-ear fence pickets, flat top pickets and French Gothic pickets. These slats are usually unfinished, but they can also be stained or prefinished. Wood fence pickets can also be curved to create a picket rail.
These slats are often painted white to provide the classic look of a white picket fence. However, homeowners can choose from a wide range of colors to match the color scheme of their house. In addition, the pickets can be painted to match the landscape or the surrounding vegetation.
To install the pickets, you must first prepare the holes for the posts. Dig the posts to a depth of at least 36 inches below ground level. You should also add a concrete footer at the bottom of each post to give it extra stability. Use a concrete mix that is designed for fence posts, and pour the mixture into the hole. Fill the rest of the hole with gravel.
You can also use the remaining space in the ground to build a retaining wall to keep water and debris away from the fence. Once the posts are in place, you can install the fencing panels. Before you begin construction, check your home’s title documents for any easement rights that run through or near the site. It’s also a good idea to call your local utility locator hotline and have technicians mark any buried services.
A picket fence can add a classic touch to your property, and it can help you get privacy without closing off the view of your yard from the neighborhood. It is also a cost-effective alternative to hiring someone to build a full-fledged fence for you.
Welds
Installing the fence panels or pickets to the rails is where your fence starts to take shape and gain its defining character. Panels are large pre-fabricated pieces that provide a uniform look and can be attached in various ways to the posts. Individual pickets create a more traditional white picket fence style and are attached to the rails with screws or nails. Whichever type you choose, it’s important to be sure to follow your local building codes and to respect the property lines of your neighbors. If you build over your neighbor’s property line, it could lead to a legal dispute and expensive consequences, including having to remove and rebuild the fence. To avoid this, get a plat or scale map of your neighborhood that shows the exact location of property lines. You may also be required to get a permit and/or meet height restrictions.
In addition, you might be required to brace newly installed posts to ensure they hold up under the load of the fence. Also, if your yard has underground utilities such as gas and electric lines you may be required to call 811 before starting any construction work. This service will notify the utility companies to mark their lines, preventing accidents and costly damage.
Although a fence is not an especially complicated structure to install, it’s best to hire a professional with experience building them. It’s a labor-intensive project that can become challenging when dealing with rocky, uneven or sloping ground. A professional contractor has a crew to help, allowing them to finish the job much faster than an individual working alone. They can save you money by buying the materials you need at the lowest cost.